June 8th, 2016
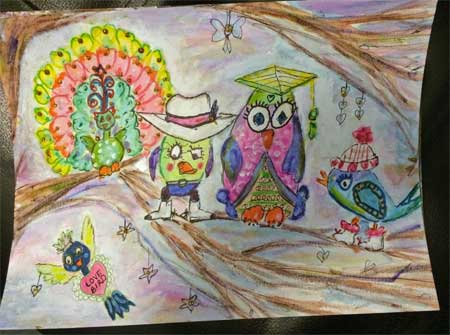 Week Six from Lifebook 2016 featured Tamara LaPorte teaching how to make her famous Quirky Birds painting.
Although I totally love Tam’s Quirky Birds, I am not at all happy with the results that I achieved.
We were to use watercolour paints for this one. At the time, I had only watercolour crayons and I could not seem to get the vibrant colours that Tam achieved in hers. I have since purchased water paints and practiced with them. My more recent watercolour projects turned out more to my liking.
Anyway, the quirky birds are supposed to represent traits of people in our lives. Without naming names to protect the guilty, (and to save my hide should the guilty figure it out LOL) I have made Peacock Bird, Cowboy Bird, Intellectual Bird, Canuck Bird and Love Bird.
Someday I am going to try this one again and see if I can get an effect that I like better.
June 7th, 2016
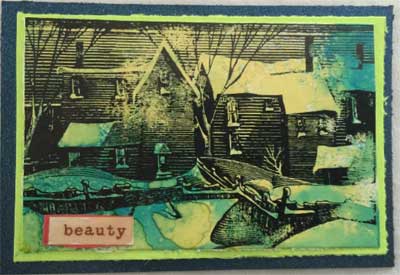 This is an artist trading card (ATC) themed Winter Vacation. I made it for a swap at the online art group called Art for the Creative Mind. You anyone is interested in the group, the address is https://ca.groups.yahoo.com/neo/groups/artforthecreativemind/info
For the background, I went with the polished stone effect, made with alcohol inks on a glossy paper.
I used black ink and what I thought was an appropriately themed stamp called Clapboard Houses from The Old Island Stamp Company.
The ATC is mounted on sturdy green cardstock.
June 6th, 2016
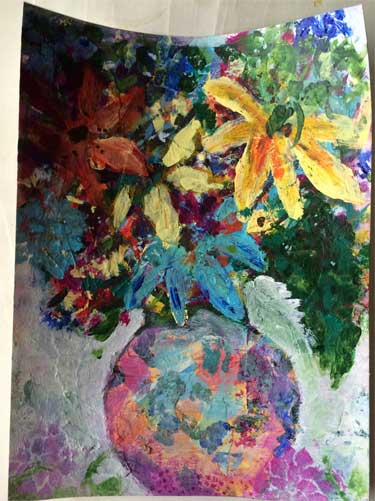 Week 5 from Lifebook 2016 is taught by Pauline Agnew. She named it A Vessel Full of Tenderness.
I think this is one of my favorite lessons. As the picture shows, we did a bowl of flowers using collage and mixed media techniques.
If I recall this correctly, we made the background using many layers of collage and paint and handwriting. Then we drew a loose image of the bowl, and painted the flowers and greenery on top of the bowl.
We did not paint the bowl at all, but rather, we used white acrylic paint to go AROUND the bowl, allowing the underlying collage to show through.
I used a floral stencil at the bottom to make a couple of flowers lying “on the table”.
June 5th, 2016
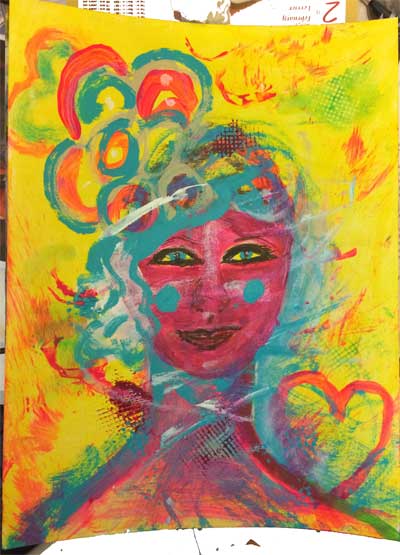
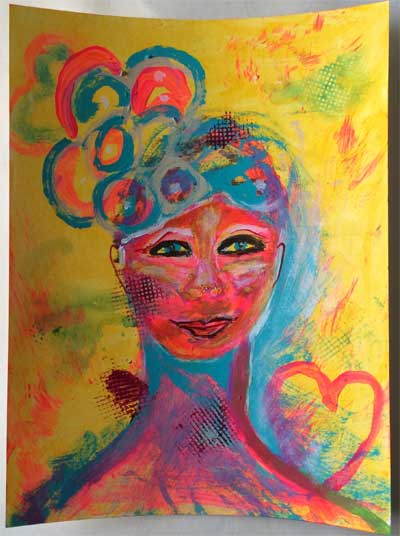
This is a bonus lesson from Week 4 of Lifebook 2016. The instructor is Annie Hammon. She called it Fearless Art.
The point of this lesson was to get rid of the restrictions and the inner critic that play such a role when many of us try to create art.
Annie did a painting with her young daughter. The daughter was allowed to smear paint as she wished, and as Annie said, “Its all good.”
Annie would paint over the daughter’s painting, and then the daughter would have another go at it. This continued until Annie decided the painting was finished.
Lifebook participants who had young children were encouraged to make a painting the same way. Those of us without little helpers did the best we could, imaging that a child was helping with the paint smearing.
This is the picture I made. The bottom represents the first try. After deciding she was finished, I decided to smear a little more paint around. Thus, we have the top version.
Its a fun and freeing way to make art.
June 4th, 2016
 Oh my gosh, I am SO far behind in updating this blog. What can I say? Life gets in the way.
Anyhow, this picture is a mixed media project taught in Week 3 of Lifebook 2016. The instructor was Melody Ross.
I’m trying to remember the details, but we created a background using stamps or stencils, handwriting and acrylic paint. We drew a woman holding a box of wisdom. The box of wisdom contained some of the life lessons that we have learned thus far in our journey on planet earth.
If I recall, there was supposed to be a flap on the front that opened to display handwriting or something. I opted not to do the flap and just went with the picture as shown.
February 24th, 2016
 This is another Lifebook Lesson from Week Two, 2016. The instructor was Tamara LaPorte of Willowing Arts, and the title was “This Year I’m Letting Go Of…”
Essentially, the project involved creating a collaged mixed media background that included handwriting, stencils, splattered paint and various other effects.
The main element is a zentangled butterfly. I have little experience with zentangles, but did the best I could. I used a black Sharpie.
The butterfly has a long white “tail” that has handwriting placed along its length.
Its pretty wild but I rather like it.
February 23rd, 2016
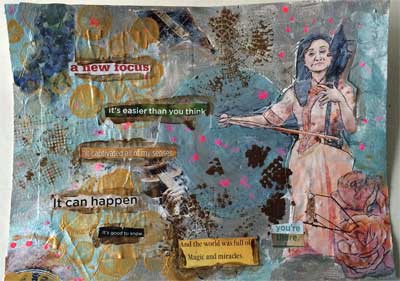 This mixed media collage represents a bonus lesson on Lifebook 2016. Its a week two bonus, and the instructor was Ivy Newport. The name of the painting was, “Patch it Up, Make it Shine.”
As is true for every lesson, participants are encouraged to use their own products rather than to buy new, and to go where our “muse” takes us, rather than adhere strictly to the lesson.
This lesson involved many layers of collage, some of which we covered up and some of which we muted out but left clearly visible.
The Asian woman playing the musical instrument, the roses to the bottom right, the berries in the upper left and the text words are cut from brochures and magazines. The painting involves hand writing, covered collage images, stencils and marking pens.
The instructions were to “make it shine” with metallic paint. I used several colors of Luminiere fabric paints, which worked quite well.
In real life, the picture shines brightly.
February 22nd, 2016
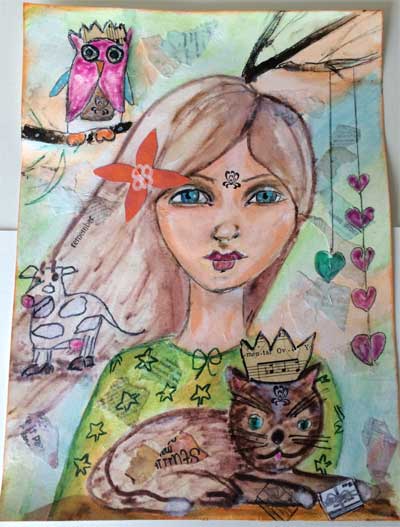 This is the main lesson from Lifebook 2016, Week 1. Again, the instructor is Tamara LaPorte. The name of the lesson is The Happy Traveler.
We collaged the background and then drew and painted the woman’s face and upper body. The orange flower in her hair is a paper flower that I made last year. The small mark on her forehead is a rubber stamp with black ink.
The idea was to select some animals that represented us, or some aspects of ourselves that we wanted to take with us on our journey into 2016.
My main animal is a cat, because I am one step away from being a Crazy Cat Lady. I also chose an owl, because I love owls and I love the fact that they represent wisdom. For reasons that I don’t quite understand, I also wanted a cow. Perhaps it is because I was born and raised on a farm and we had livestock.
I gave the cat a little crown cut from old music paper.
In Tam’s lesson, we created a small envelope that we attached to the bottom of the page. The envelope was to contain a letter to ourselves.
I wasn’t in the mood to do that, so I stamped out a small envelope, cut it out and glued it by the cat’s paw. It represents my letter to myself.
I am pleased with the girl’s face. I think it is the best job of coloring a face that I have done so far.
If anyone is interested in learning more about Lifebook and Willowing Arts, you can find out more here: Click here to view more details
February 21st, 2016
 I am once again enrolled in Willowing Arts Lifebook. 2016 is my fourth year, although I did not complete the first year.
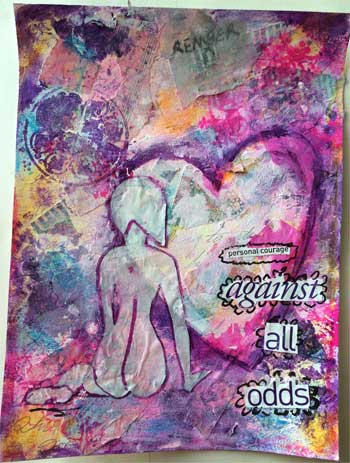
This picture is my version of the warmup lesson offered in Week 1. It was designed and taught by Tamara LaPorte, the owner of Willowing Arts. The name Tamara gave to the lesson is “Creativity Takes Courage: A Playful Warmup Lesson”.
I deviated from the lesson quite a bit.
The girl’s silhouette was a leftover from a lesson in 2015. I had drawn her on sandwich paper. For this warmup lesson, I cut her out, glued her over my background collage and outlined her with plum colored ink.
The background is a combination of hand writing, collage, stenciling and various paint spatters.
I cut the words “Against All Odds” from a magazine and glued them on. The smaller text reads, “personal courage.”
I think the text and words had some special meaning for me at the time I made this, but for now, I forget what that was.
If anyone is interested in learning more about Lifebook and Willowing Arts, you can find information at this link: Click here to view more details
February 20th, 2016
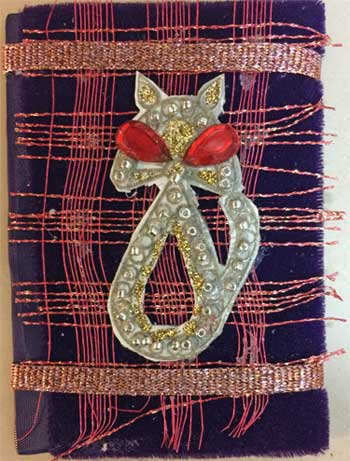 This is an artist trading card (ATC) made for a swap at Art for the Creative Mind.
The ATC’s theme was to be “the eyes have it”.
I had a rubber stamp with the cat shape that is shown. I stamped the car on light card board and heat embossed with pewter colored embossing powder.
Next, I glued small seed beads along the edges of the cat. I added some glitter glue where I thought it might look good.
Finally, in keeping with the theme, I glued large red rhinestone beads to form the cats eyes.
The background of the ATC is a lovely velvet fabric, given to me by a friend who sews.
I had some red and gold mesh fabric that looked good with the purple velvet, and also matched the cat’s red eyes.
The ATC is on its way to its new owner.